
Welcome to the debut posting for the CurtainwallBIM blog. Our software of choice is Revit and our goals are to address any BIM related curtain wall issues, disseminate CW related information, and to help solve any problems ourselves or through dialog with other blog followers. If you see a problem, or a better solution, please feel free to jump in and add your two cents. We'll start by demonstrating the solution to the problem of curtain walls automatically joining when their end nodes get close to one another.
Disallow Join to Prevent Curtain Walls From Attaching
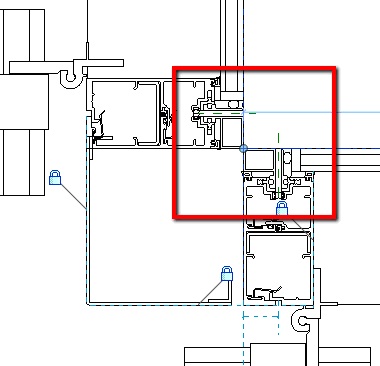
In most cases, at an inside or outside corner condition, the ends of the adjacent Revit curtain wall objects should meet. A common issue arises when the two curtain wall objects end near each other, but are not intended to meet as shown below.

In this situation, when moving the endpoint of one CW object near the other, Revit will understand this to mean that the two walls should be joined and will move the endpoint of the unselected wall until it matches the endpoint location of the selected wall forming an intersection as shown below. This may cause a warning dialog box to appear if it overrides constraints for one of the curtain walls.
To avoid this situation, follow these steps:
1) Before moving the endpoint of one of the walls, select the wall then right-click on the blue circle at the endpoint. If you right-click anywhere except over the blue circle you will get a different menu,
2) From the menu that opens, select Disallow Join.

3) Repeat the process with the adjacent wall - both walls must have Disallow Join turned on.
4) Move the endpoints of the wall as required and they can be positioned without regard to the other wall's endpoint.
If the design changes and you need to join the walls, you can either right-click on the endpoint and choose Allow Join from the menu or click on the T-shaped icon that appears near the endpoint when the wall is selected.

This procedure works in a similar manner when curtain walls butt into each other rather than forming an intersection.
One of my favorite modeling methods of dealing with curtain wall corners is to erase the corner mullion on one of the walls and replace the corner mullion on the intersection wall with a wider corner piece. This works well for both inside and outside corners.
ReplyDeleteIbrahim,
ReplyDeleteThat's a good approach at intersecting curtain walls. I've done that before, but I prefer to put half the mullion on each wall so that I can ensure that they're lining up properly. Do you constrain the wall, without the mullion profile, to a reference plane in the mullion profile family?
Jon
To date, I have not. It's a good idea.
DeleteJon,
ReplyDeleteHow does half a mullion work? I assume you would still have to dis-join the walls still. Plus half a mullion on each wall creates (in my mind) an "L" shaped mullion and not a square shaped mullion. Personally I use one curtain wall without a mullion and the other with the "square" end mullion. Then I just align the curtain wall mullions together (outside faces). Everything from that point on looks perfect in 2D views... and even in 3D.
John,
DeleteI'll post an example of how to do this tomorrow.
Jon
Hi,
ReplyDeleteJust curious if you going to be uploading a workflow on how your utilizing the curtain wall tool in Revit and to what extend are you using Revit families.
For example:
For stick frame I would be assuming that you are using mass then dividing with curtain grid and then using mullion. How about unitized jobs. Also will you be sharing your families.
Thanks,
Patrick
Hello Patrick and welcome to the blog.
DeleteSure, I can share workflow. Is there something specific that you're looking for?
The approach I take depends on the LOD required for the job rather than the type of construction. I usually start with the Revit Curtain Wall objects and divide those up with curtain grids and then assign the mullion profiles as appropriate. For a higher LOD, I put the detail in the panels families (which include the mullions at that point).
I'll share the families when I can depending if I pull the information from a project - this might bring up an issue regarding intellectual property.
Jon
Hi Jon,
ReplyDeleteAs to my last comment for workflow I guess I can break it down to more by asking this. The above detail is a typical inside corner. What part of the detail is model geometry. Where did you utilize detail components. Are there masked regions or filled regions being used.
Thanks,
Patrick
Note: I really like where this blog is going too and hope to keep asking questions.
Hi Patrick,
ReplyDeleteYour questions are always welcome and, if you become a follower of the blog, you should get notifications with new posts.
First off, I'd say that this isn't a typical inside corner; those are usually comprised of a single, angled mullion with each half on the adjacent curtain wall. Take a look here: http://www.curtainwallbim.blogspot.com/2013/02/mullion-halves.html for a similar examply of an outside corner. This example shows two adjacent curtain walls that terminate near each other without forming a true corner.
I try to keep the mullion profiles simple while making them look as complete as possible. The mullion profile line simply follows the outside perimeter of the mullion, the glass pocket to the extents of the infill panel, and down the middle of the seam between the male/female mullions. Everything that looks like detail is just non-profile linework meant to clarify the mullion dies, clips, etc. used. There are no mask or fills in these details, they're not necessay for this level of the project. I hop this answered your questions.
Jon
Positive site, where did u come up the information on this have read a few of the on your website now, and I really like your style. Thanks a million and please keep up the effective work.
ReplyDeletecurtain wall detail