
The basic workflows for creating and assigning mullions to a
Revit curtain wall are fairly straightforward. You can either design a mullion type, with a
specific mullion profile family designated in the Profile parameter, then
assign that type to a curtain grid line or select an existing mullion on the
curtain wall, duplicate the type, then assign a new profile to that mullion. Profiles are assigned in the Type Properties
dialog box.

In the mullion profile family file, there are two reference
planes and both have their positions pinned by default. At intermediate curtain wall grid lines, the
vertical reference plane in the profile family is aligned with the grid line
while the horizontal plane is aligned to the front of the curtain wall. In jamb, head, or sill conditions, the edge
of the profile is aligned to the edge of the curtain wall so that the entire
profile is enclosed within the extents of the curtain wall.

The image below shows a 20’-0” long curtain wall with four
vertical mullions in place. The continuous
dimensions, along the top and bottom, both add up to the total length of the
curtain wall, but the first and last dimensions of each string are different.

What is causing the discrepancy? The top string of dimensions is measuring to
the center of the mullion as defined by the location of the vertical Center Of
Mullion reference plane in the mullion family file. The bottom string of
dimensions is measuring to the horizontal midpoint of the vertical
mullion. These should be in the same
location, but in this instance, they are not.
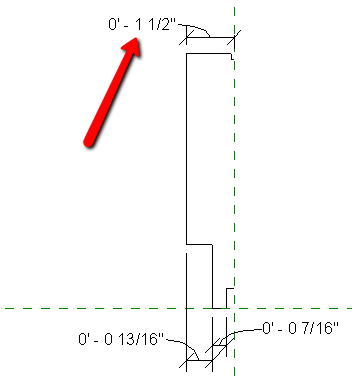
Let’s take a look at the mullion profile.

As you can see, the mullion profile is not centered on the
reference plane. This is a situation
that we’ve encountered, on occasion, when using content provided by third
parties.

Why is a small dimensional inaccuracy a concern? Mullions, anchors, kickers and embeds are
usually aligned to their respective center lines. If one of these is not located properly, then
it may cause a clash at each occurrence which can add thousands of clashes to a
project that would need to be addressed.
To remedy this, we can’t simply select the left-most line of
the profile and change the dimension; this would result in a non-symmetrical
and inaccurate mullion. Instead, we’ll delete half the profile, fix
the remaining half, and then mirror the lines to complete the profile as shown
here:
1.
Delete or trim
the side of the mullion that is shorter than the other.

2.
Add and lock any horizontal dimensions that must remain
constant.

3.
Change the overall length
4.
Select all of the lines (hover over one, press the Tab
key, then click the left mouse button) then use the Mirror – Pick Axis tool
from the Modify panel to mirror them about the vertical reference plane.

5.
It’s a good practice to use a few lines as possible in
your profiles. The four short, horizontal
lines that touch the vertical reference plane can be reduced to two lines by
deleting one and stretching the other at both ends of the mullion. This will
also eliminate an unnecessary vertical line in your elevations.


6.
Save the family then use the Load Into Project tool to
load the profile family into the Revit project.
In the Family Already Exists dialog box, choose either the Overwrite The
Existing Version or Overwrite The Existing Version And Its Parameter Values
option, depending on whether the profile has parameters included.

7.
In the project, the dimensions measuring to the
centerlines and the dimensions measuring to the midpoints are now equal.

Accurate curtain wall mullion profiles are essential to
creating accurate curtain walls in Revit.
A little time spent ensuring that your profiles are correct at the
beginning of a project can prevent headaches and reduce revision time later in
the project’s lifespan.