
Make the planer surface locations reside at half the
thickness of the wall system. The
perimeter needs to align to the outer edges.
If you are dealing with a single surface, keep your mass
simple. It’s easier to edit that way.
Things to remember about corners and
mullions that end up misshaped:
It is frequently easier to build in-place little elements
than to try to get the Revit ‘Curtain System’ tools to make things go as you
wish. Sometimes the standard Curtain System
controls simply cannot do it. Don’t be
afraid of in-place elements.
Set up either a level or a named reference plane at the
height that you need the curtain system to be located. If it needs to be at an angle then it must be
a named reference plane. In this case we
are using Level 3.

Under the “Massing and Site” tab, select “In-Place Mass”.

Give the Mass a name.

Set the Work Plane to the named reference plane or to the
level that you set up.


Go to the 3rd floor plan view, or to a view that
you can best see a perpendicular view of the Mass that you are about to
make. Place the lines of the new Mass at
the edges of the area that you need the curtain system to occupy. Think of this as a wall profile. The perimeter edge controls the outer limit
of the system when it is created.


The Mass is adjustable.
You can use the arrow handles to change the size or align to elements if
you choose.

Go to a 3d View to access if the Mass turned out as you
planned.


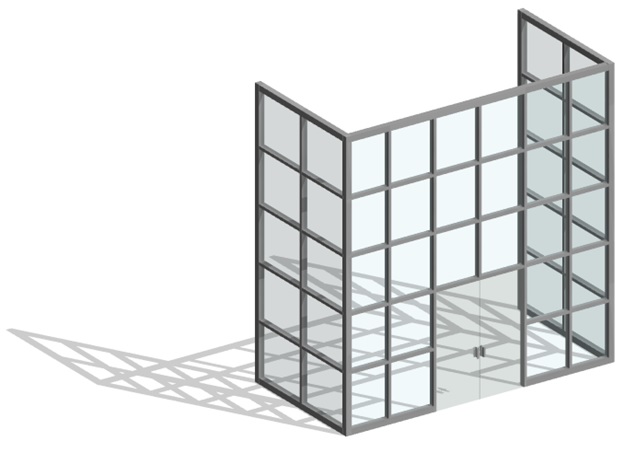
Zoom in on the vital areas to be sure that your Mass is
aligned as you need it. In the image
below notice that the Mass is placed at one half of the thickness of the upper
mullion on its lower boundary. The Mass
is aligned to the outer edges of the adjacent curtain walls in plan. This is done because the curtain system goes
in similar to a curtain wall. Outer
Mullions know to stop flush with the edge.
System or Wall centerlines define the placement of the mullions and
glass.

Select “Create Form” and then
“Solid Form”. Depending on your view, you
will see a multi directional control appear.
It can be used to adjust the size of the mass.


Rotate the model to allow access to the surface that you want
to apply the curtain system to. Select
the bottom of your new Mass, as shown below.
You can select one, mulitple or all of the surfaces of the Mass. We just need one for this exercise.

Now that you have selected which surfaces you want to place
the curtain system, select “Create System”.
Revit now puts the system in that place.

The newly applied system might not align exactly as you
wish. There are a few things that can
still be edited in the system at this point.
Curtain grids can be adjusted as they are with curtain walls. Many things in a curtain system are by
default locked. I recommend using the
crossing selection box to select everything in the area that needs edited, and
unpinning it all. Otherwise the grids
and mullions will not be editable.


Once the things are unpinned you need to expose the grid
lines. They are normally difficult to
select because they hide behind the mullions.
With a normal surrounding selection box, select the mullions that need
to be realigned. Use the filter to be
sure that you only have Curtain Wall Mullions selected. Use the Temporary Hide button to hide the
mullions. Now when you hover the mouse
over the curtain grids they are easy to select.

Uncheck everything except the mullions.

Temporarily hide the mullions.

First select the line that you want to align to. Then select the second line to align it.

Continue the process to get the rest of the curtain grids
aligned. When you need to add or delete
some of the curtain grid lines, they work in the same manner as the curtain
walls.

To add additional grid lines, under the Architecture tab,
select “Curtain Grid”. When you float
your mouse by an edge of the system Revit shows temporary dimensions to let you
know where the new grid line will be.
You can edit the location of that line after it is in place. See instructions earlier in this Blog.


Once the locations are as you want them, select the
Temporary Hide button to unhide the mullions. Select Reset.

Select the Mass. You
can choose to hide or delete the Mass. If you think that you may need to edit
the Curtain System lid in the future, then hiding the Mass is probably your
best choice. You can delete it and the
Curtain System that used the Mass to be placed will remain, though it will have
limited edit ability after the mass is gone.

Review your model to assure that things align as you wish.

The End.
We welcome your comments and feedback.